Intro to Web Development
Today
- Review
- CSS Selectors
- CSS Box Model
- Container Divs
Let's Review...
Basic structure of an HTML page
              <!DOCTYPE html>
              <html>
                <head>
                </head>

                <body>
                </body>
              </html>
The DOCTYPE informs the browser that this file contains HTML5.
html tags
              <!DOCTYPE html>
              <html>
                <head>
                </head>

                <body>
                </body>
              </html>
The html tag wraps all content on the entire page and represents the start and end of an HTML document.
head tags
              <!DOCTYPE html>
              <html>
                <head>
                </head>

                <body>
                </body>
              </html>
Content that will not be displayed to the user. (ie: keywords to help your website surface in search results and CSS to style content.)
body tags
              <!DOCTYPE html>
              <html>
                <head>
                </head>

                <body>
                </body>
              </html>
Content that will be displayed to the user.
HTML Elements
Container HTML Element
Your Content
Self-Closing HTML Element
<tagname attribute="value">
Review
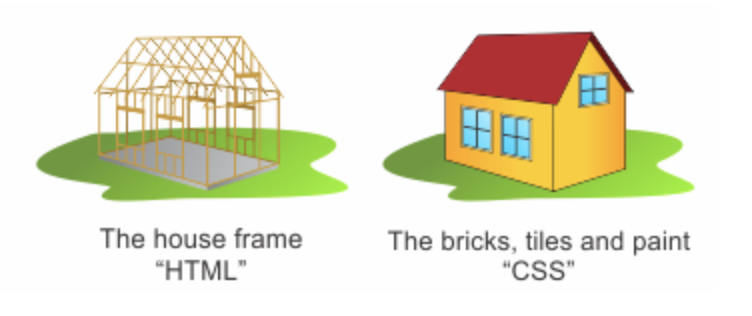
A static website has two layers: HTML and CSS
HTML (Structure) vs CSS (Presentation)
Review - CSS
CSS stands for Cascading Style Sheets
"Cascading" refers to the "Cascade", which determines which CSS rule gets applied to our HTML.
Review - CSS
Use the <link> tag inside the <head> tags.
              <!DOCTYPE html>
              <html>
                <head>

                </head>

                <body>
                </body>
              </html>
Review - How to Write CSS
| HTML | uses tags | < > |
| CSS | creates rules | { } |
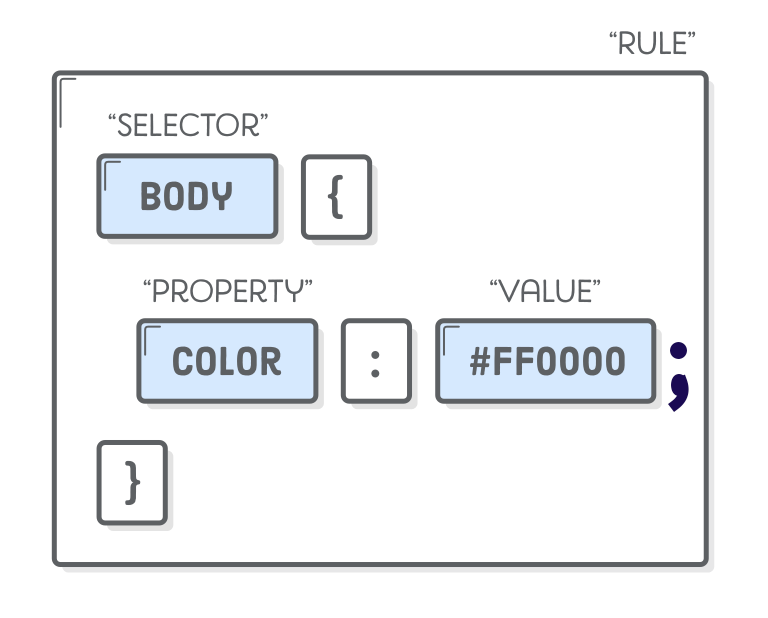
Image from internetingishard.com
Create a Web Page
We will need:
- Atom, a text editor used to write code
- Chrome, a browser to render our website
- A project folder
- An HTML file
- A CSS file
HTML Setup
Copy the following HTML
              <!DOCTYPE html>
              <html>
                <head>

                  My Website
                </head>

                <body>
                  Welcome to my site!

                  First paragraph
                  Second paragraph
                </body>
              </html>
CSS: Type Selectors
Type Selectors are used to select an HTML element type.
Below is a example of using a CSS Type Selector. This will set the background-color for ALL paragraphs.
              p {
                background-color: blue;
              }
Let's Code: Type Selectors
In the .css file, add a CSS rule that:
- Selects all <p> tags
- Sets the background-color property to blue
              p {
                background-color: blue;
              }
But what if we only want one paragraph to be blue?
CSS: Class Selectors
- Target HTML elements by using the HTML tag's class attribute.
- Can be any name you choose
- Written in lowercase letters
- Words are separated by hypens
Below is an example of how to add a class attribute to an HTML tag.
Paragraph tag with a class attribute.
CSS: Class Selectors
A class selector is written in the CSS file by placing a period (.) before the class name.
              .my-class-name {
                background-color: yellow;
              }
Let's Code: Class Selectors
In the .html file...
Add a class attribute, with the name "my-class-name", to the first paragraph tag.
First paragraph.
Let's Code: Class Selectors
In the .css file...
- Remove the CSS rule that selects all <p> tags.
- Add a CSS rule that selects the class name and set the background-color to a new color.
              .my-class-name {
                background-color: yellow;
               }
Type Selectors vs Class Selectors
Type Selectors are very useful as they can target all <p> tags or all <h2> tags.
Class Selectors are important because they can differentiate between HTML elements of the same type.
              First paragraph
              Second paragraph
Let's Code: Class Selectors
Add a class to the other <p> tag and set the background-color to a different color.
              First paragraph
              Second paragraph
Sharing CSS Styles
Type and class selectors = Ability to share styles
Ability to share styles = Less Work for you!
Image from teamtreehouse.com
Buttons are a good example of when we want to share CSS styles.
CSS: ID Selectors
- Target HTML elements by using the HTML tag's id attribute.
- Are unique because each ID is only used once
- Can be any name you choose
- Written in lowercase letters
- Words are separated by hypens
Below is an example of how to add an ID attribute to an HTML tag.
Paragraph tag with an ID attribute.
CSS: ID Selectors
An ID selector is written in the CSS file by placing a pound sign (#) before the ID name.
              #my-id-name {
                background-color: purple;
              }
Let's Code: ID Selectors
In the .html file...
- Remove the class attribute from the first paragraph
- Add the ID attribute, with the name "my-id-name", to the first paragraph.
First paragraph
Let's Code: ID Selectors
In the .css file...
- Add a CSS rule that selects the ID attribute name and set the background-color to a color.
              #my-id-name {
                background-color: purple;
              }
Fragment Identifiers
ID attributes can also be used as "fragment identifiers", which let's us link to another section on the same page.
Let's hop in the code and walk through an example.
Let's Code: Use IDs as Links
In the .html file...
- After the opening <body> tag, add a paragraph with the ID "top".
- Before the closing <body> tag, add a link. However, instead of setting the "href" attribute to a URL, set it to the ID attribute name, "top".
              <body>
                Top of the Page
                Go to Top
              </body>
Let's Code: Use IDs as Links
To see this work, our page needs space between the top and bottom of the page. In the .css file...
- Target the "header" class name and set the height property to 2000 pixels.
              .header {
                height: 2000px;
              }
Recap of CSS Selector Types
- Type Selectors - selects HTML by tag name
- Class Selectors - selects HTML by class name
- ID Selectors - selects HTML by ID name
              p {
                color: red;
              }

              .my-class-name {
                color: blue;
              }

              #my-id-name {
                color: purple;
              }
Seeing the world in boxes...
CSS treats all HTML elements as boxes. Some of elements are treated as block boxes and others are treated as inline boxes.
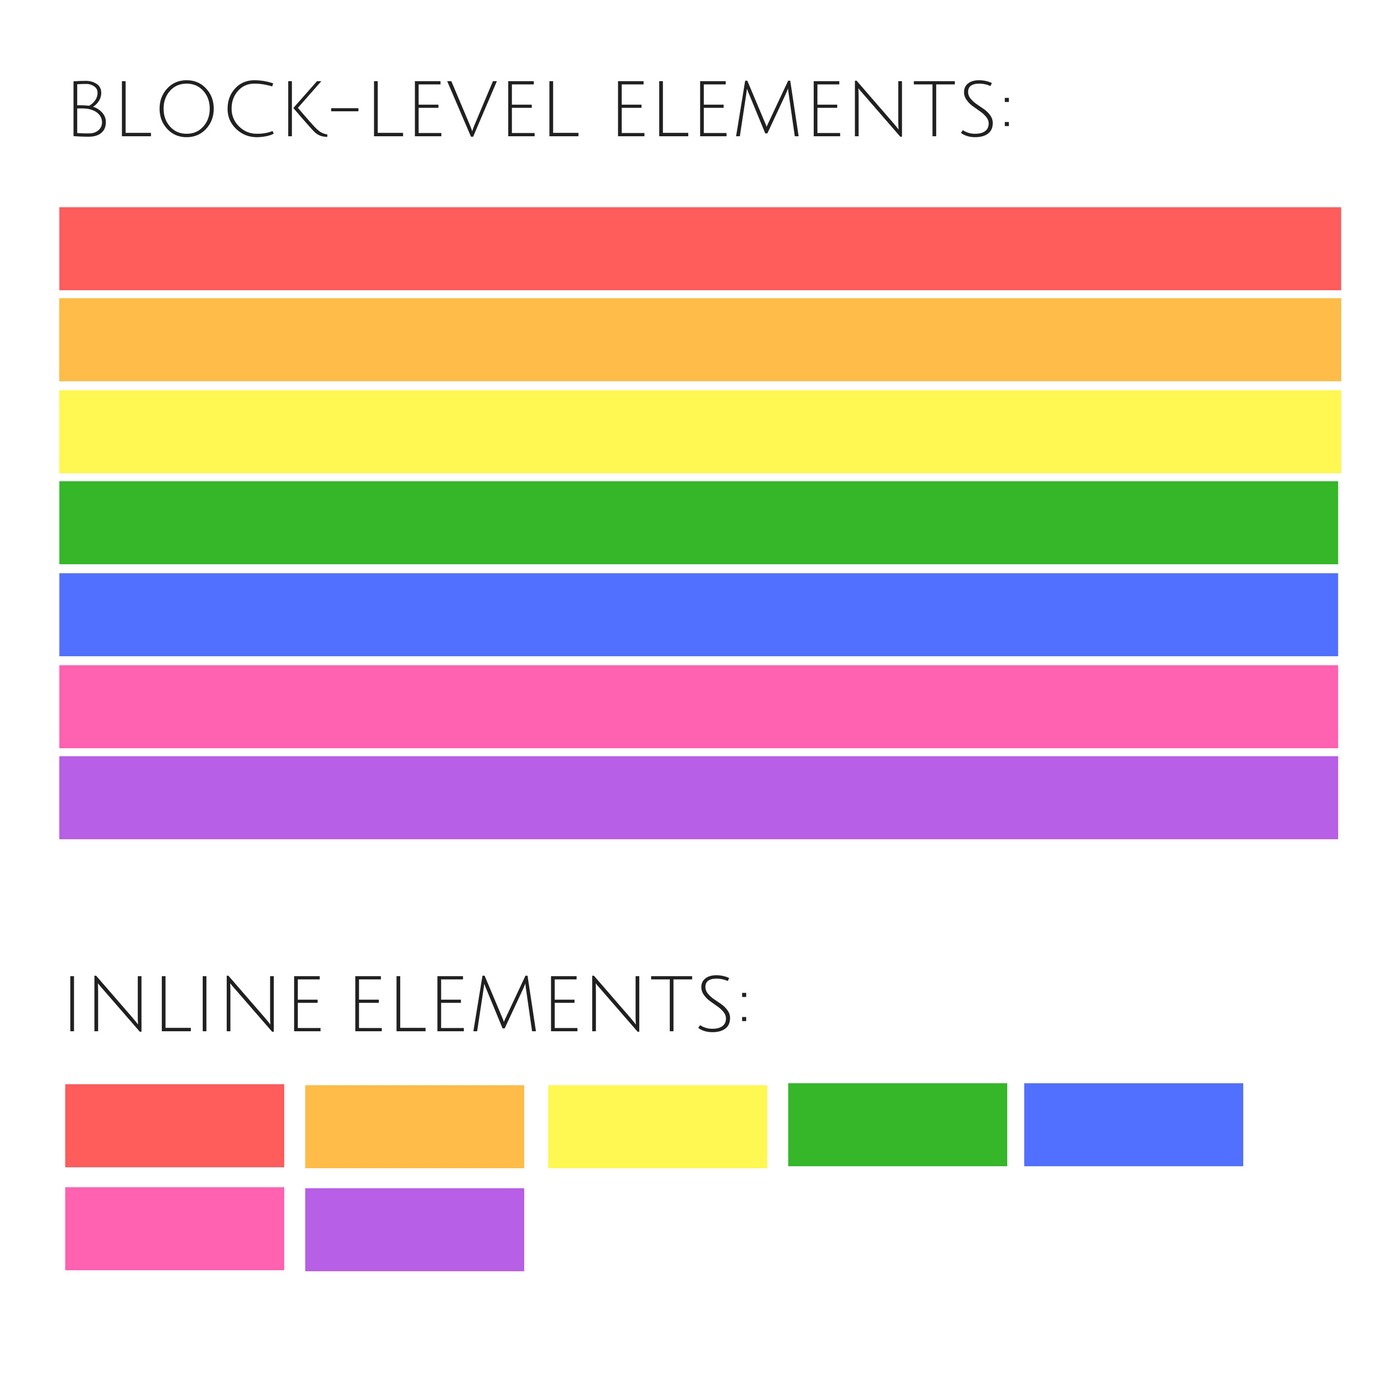
Image from https://codeburst.io
Think inside the box
Image from dovetailapp.com
Think inside the box
Image from dovetailapp.com
Let's Code: Block and Inline Elements
Replace existing HTML with the following:
              Headings Are Block Elements


                Paragraphs are blocks, too. However, em and strong
                elements are not. They are inline elements.


                Block elements define the flow of the HTML document, while
                inline elements do not.
Let's Code: Block and Inline Elements
Replace existing CSS with the following:
              h1 {
                background-color: lightgrey;
              }

              p {
                background-color: lightgrey;
              }

              em {
                background-color: lightblue;
              }

              strong {
                background-color: lightblue;
              }
Block vs Inline Elements
This example demonstrates:
- Block elements always appear below the previous block element.
- The width of block elements is set automatically to the parent container. In this case, the browser window.
- The height of block elements is based on the content it contains. The height adjusts accordingly when the browser window is narrowed.
- The width of inline elements is based on the content it contains, not the width of the parent element.
Changing Box Behavior
We can override the default box type of HTML elements with the CSS display property. For example, if we want to make an inline element behave like a block element.
              em {
                display: block;
              }
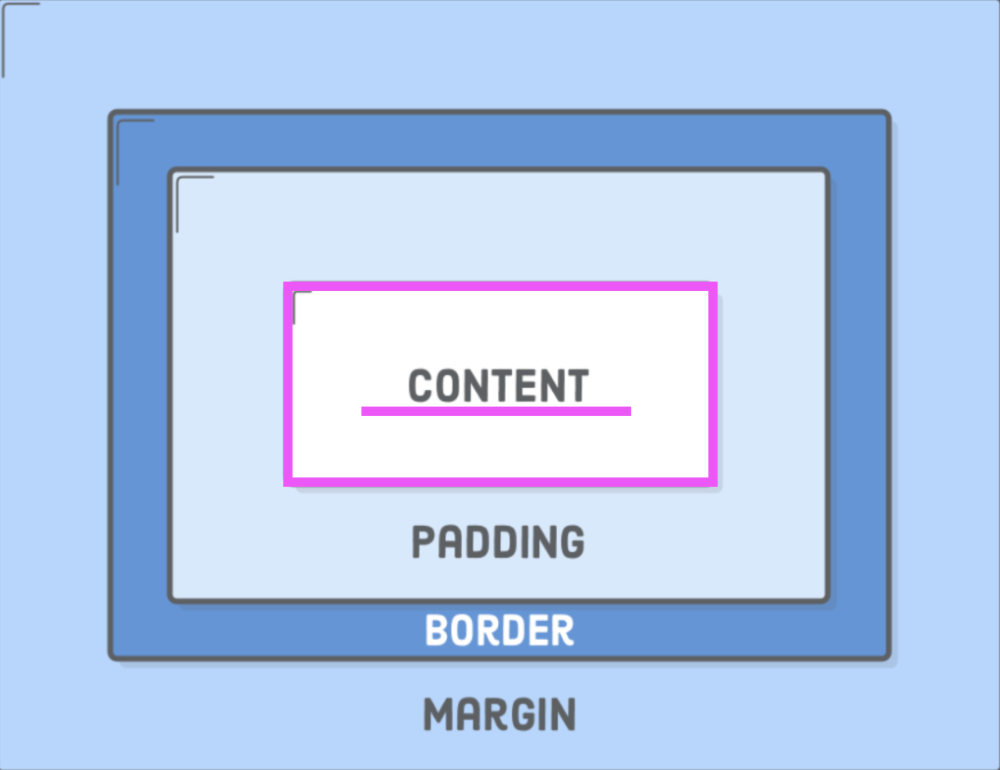
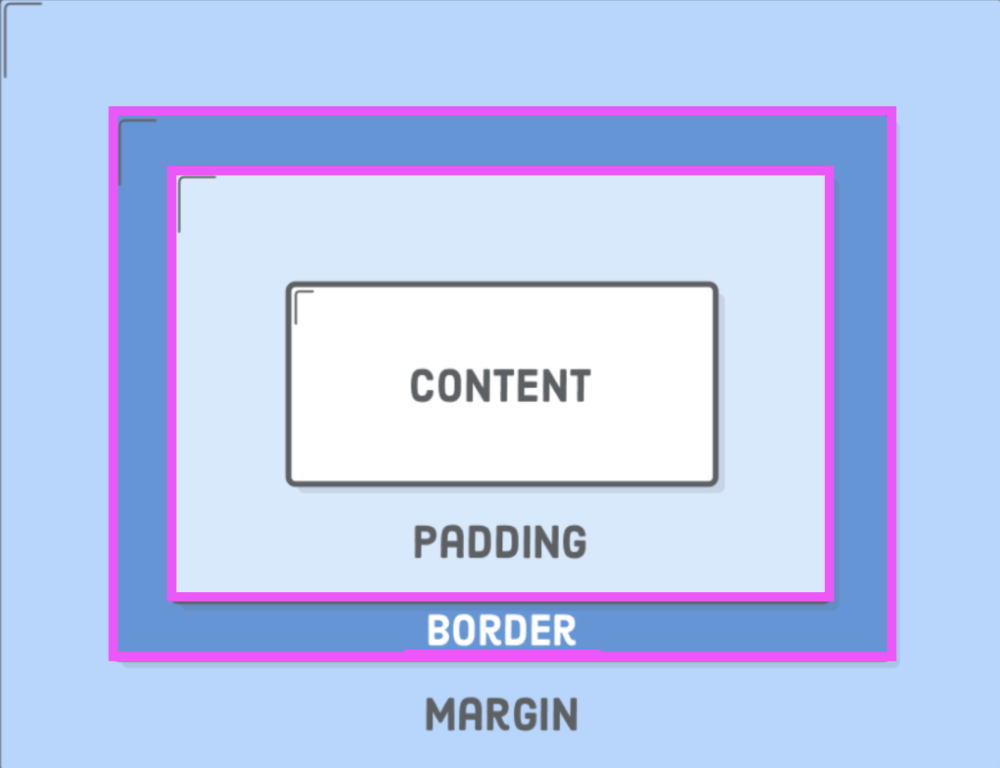
CSS Box Model
To understand how browsers treats each HTML element as a "box", let's examine the CSS Box Model. This Box Model helps us see that each box is composed of four parts: content, padding, border and margin.
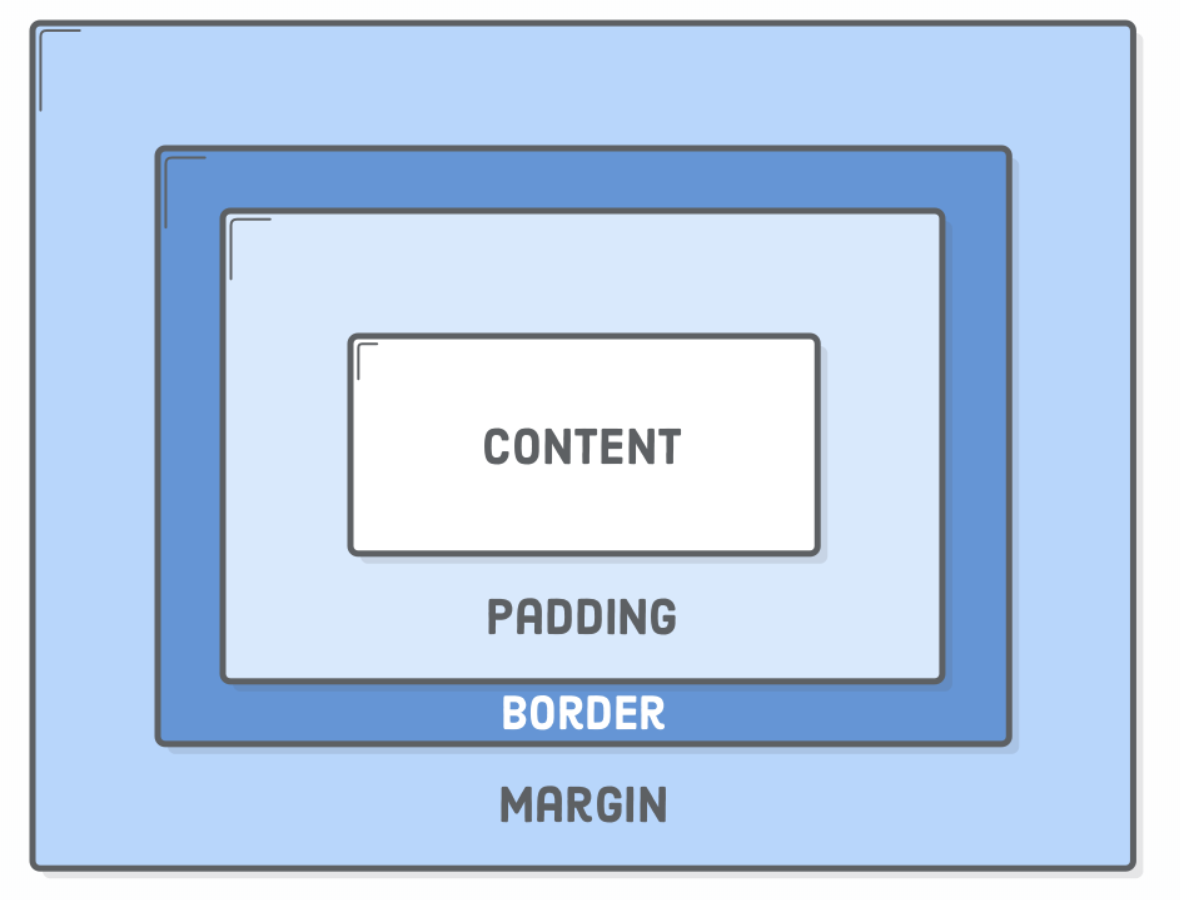
Image from internetingishard.com
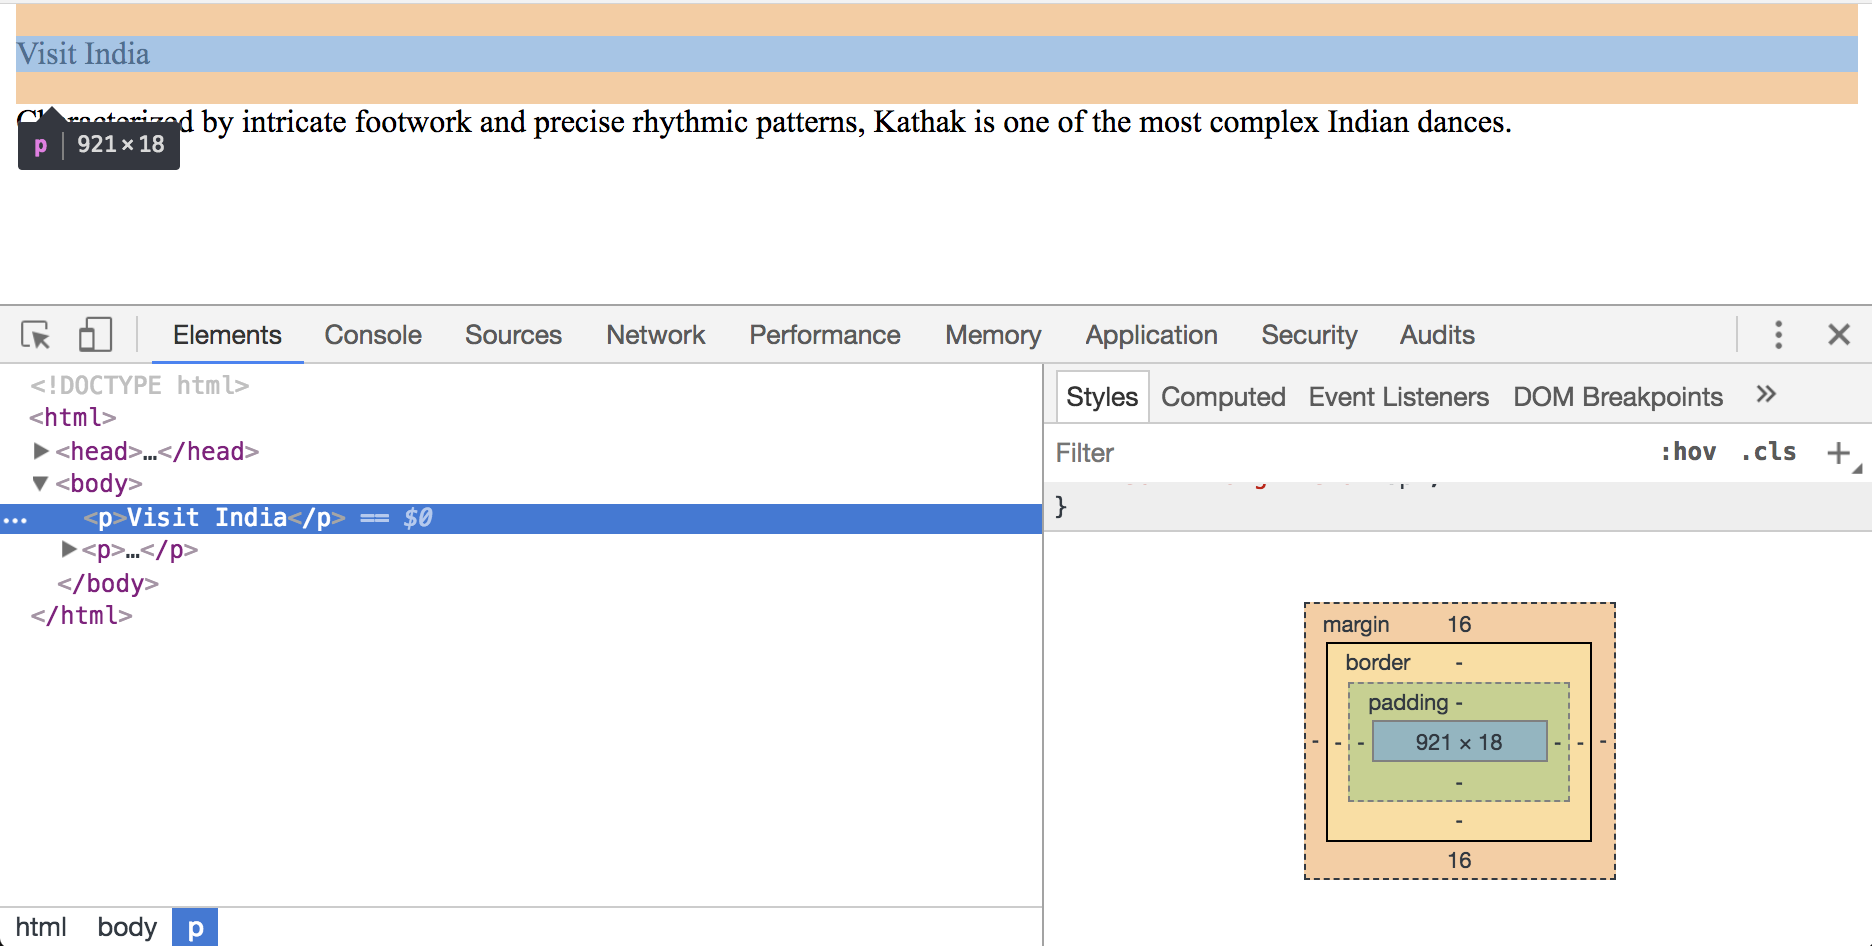
Inspecting the CSS Box Model
To help us along the way, we'll use a helpful browser tool called the inspector To open the inspector, right-click on your website and select "inspect".
CSS Box Model - Content
Content - the text, image or media content in the element.
This is content
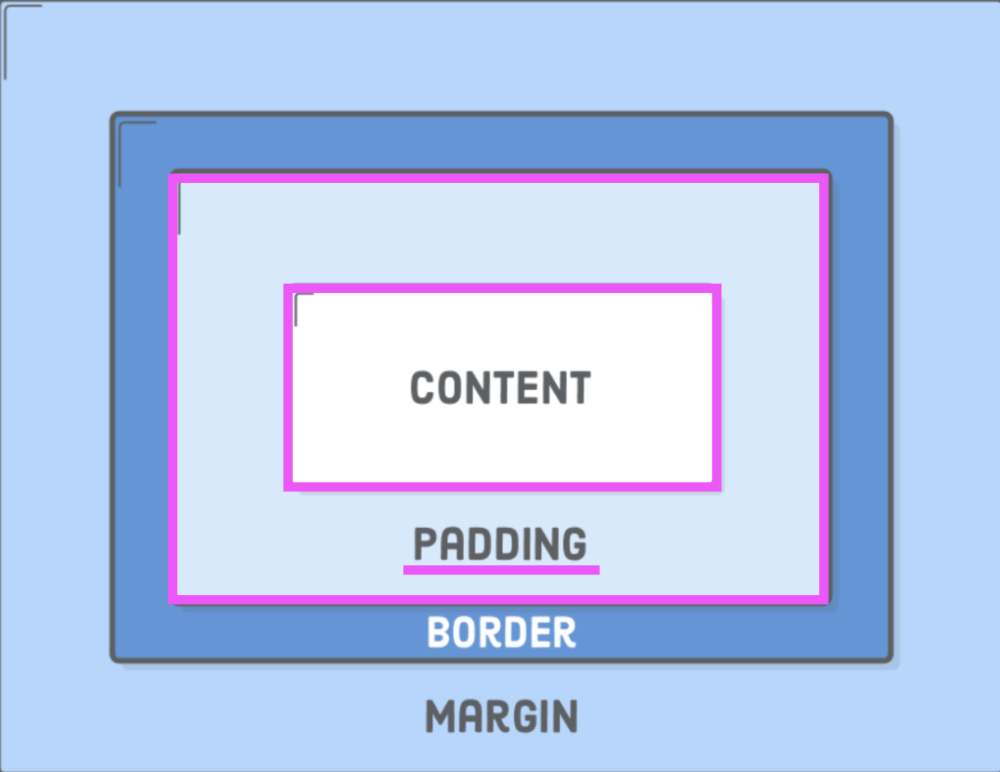
CSS Box Model - Padding
Padding - the space between the box's content and its border.
              h1 {
                padding: 50px;
              }
Individual Padding Properties
CSS properties that add padding to a specific side of the element.
              h1 {
                padding-top: 20px;
                padding-bottom: 20px;
                padding-left: 10px;
                padding-right: 10px;
              }
Padding Shorthand Format
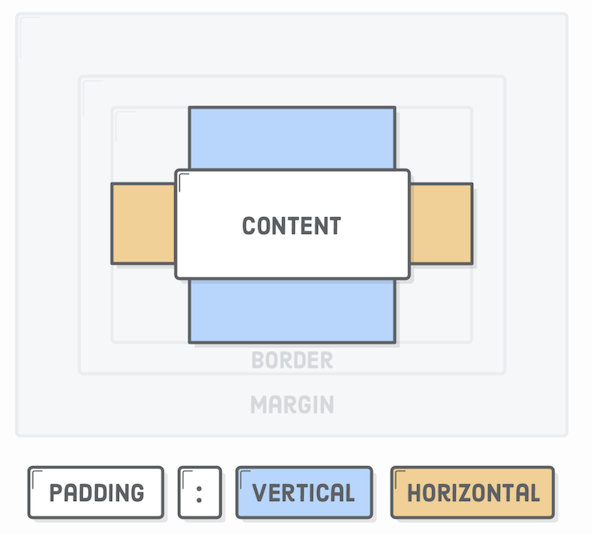
Image from internetingishard.com
              h1 {
                padding: 20px 10px;
              }
Padding Shorthand Format
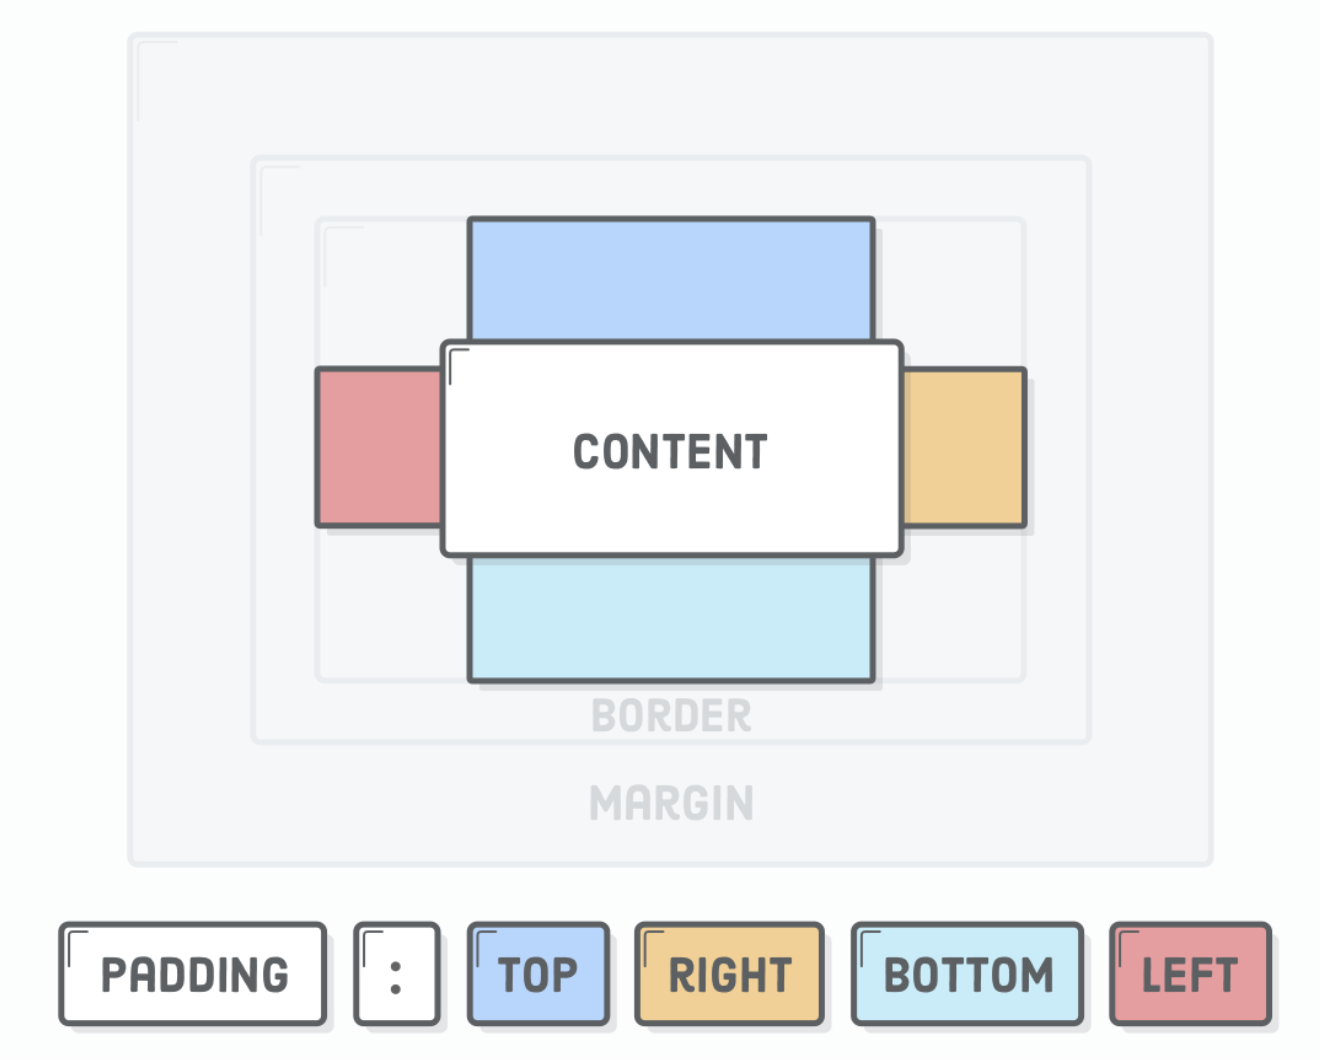
Image from internetingishard.com
              h1 {
                padding: 20px 10px 20px 10px;
              }
CSS Box Model - Borders
Border - The line drawn around the content and padding.
              h1 {
                border: 1px solid grey;
              }
CSS Box Model - Borders
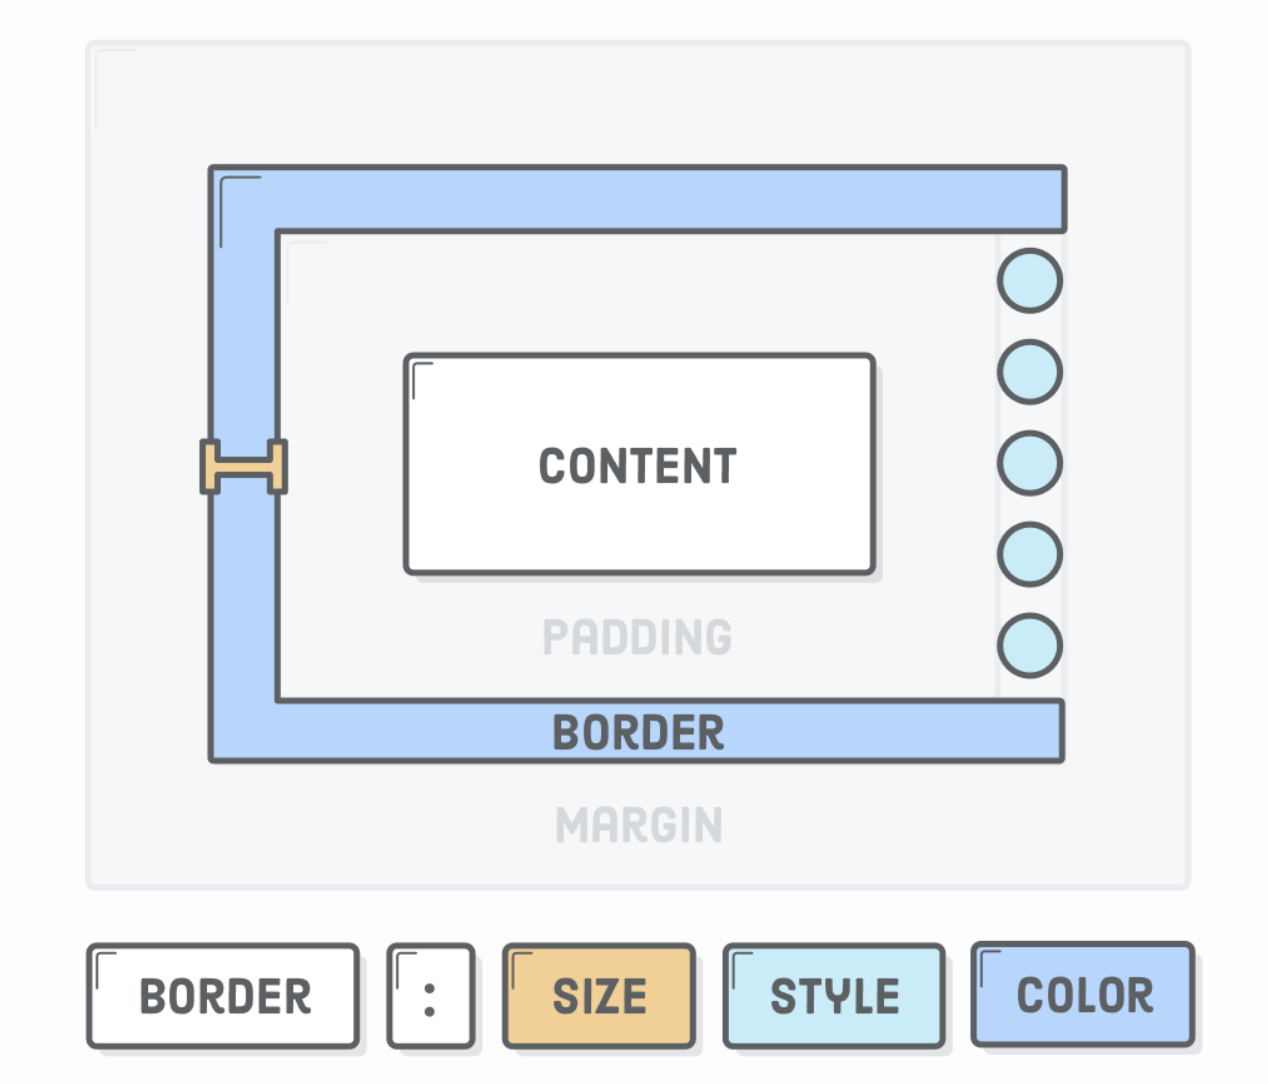
Image from internetingishard.com
              h1 {
                border: 1px dotted pink;
              }
Individual Border Properties
Like padding, there are properies that add a border to a specific side of the element.
              h1 {
                border-top: 1px solid pink;
                border-right: 1px solid red;
                border-bottom: 1px solid grey;
                border-left: 1px solid green;
              }
CSS Box Model - Margin
Margin - the space between an element and surrounding elements.

              p {
                margin: 50px;
              }
Individual Margin Properties
Like padding, there are properies that add a margin to a specific side of the element.
              h1 {
                margin-top: 10px;
                margin-right: 20px;
                margin-bottom: 10px;
                margin-left: 20px;
              }
Recap CSS Box Properties
The CSS properties padding, border, and margin can be written in the shorthand format, which accepts one to four values OR we can target a specific side.
              h1 {
                margin: /*top right bottom left*/
                margin-top: /*top*/
                margin-right: /*right*/
                margin-bottom: /*bottom*/
                margin-left: /*left*/
              }
Let's Code
Build a section with a title, a paragraph, and a button.
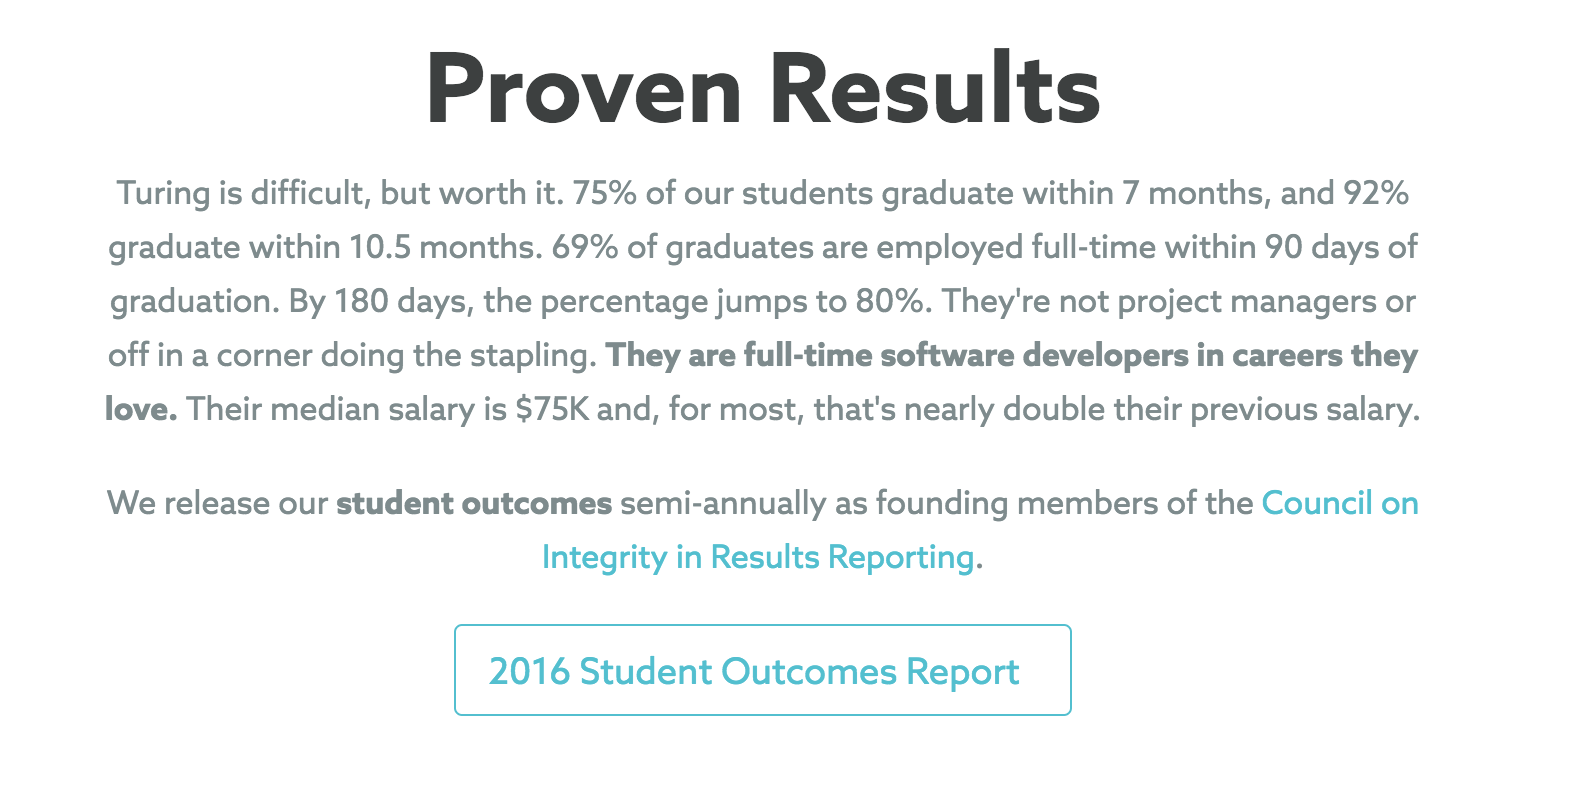
Image from turing.io
Add the Content
Scroll for full content.
              Proven Results

                Turing is difficult, but worth it. 75% of our students graduate
                within 7 months, and 92% graduate within 10.5 months. 69% of
                graduates are employed full-time within 90 days of graduation.
                By 180 days, the percentage jumps to 80%. They're not project
                managers or off in a corner doing the stapling. They are
                full-time software developers in careers they love. Their median
                salary is $75K and, for most, that's nearly double their
                previous salary.


                We release our student outcomes semi-annually as founding
                members of the Council on Integrity in Results
                Reporting.
Style the section header
Proven Results
Assign a class to target specific text:
Proven Results
Style the section header
              .header {
              }
              .header {
                font-family: Helvetica, sans-serif;
                font-size: 48px;
                font-weight: bold;
                text-align: center;
              }
Style the Paragraphs
Add a class to target the remaining paragraphs
                Turing is difficult, but (...etc...)


                We release our student outcomes (...etc...)
Style the Paragraphs
Select the font
Center the text
              .content {
              }
              .content {
                font-family: Helvetica, sans-serif;
                text-align: center;
              }
Add the button
2016 Student Outcomes Report
Add the button
Add a class to target the button.
2016 Student Outcomes Report
Style the button
Add a class to target the button.
              .call-to-action {
                text-align: center; /* hmmm... */
              }
This does not work as we cannot center an inline element.
<div> is for Division
We can use the <div> HTML container element to group other HTML elements together.
                Proven Results


                  Turing is difficult, but (...etc...)


                  We release our student outcomes (...etc...)


                  2016 Student Outcomes Report
Style the content in the Div
Our current CSS should look like this:
              .container {
                text-align: center;
              }

              .header {
                font-family: Helvetica, sans-serif;
                font-size: 48px;
                font-weight: bold;
              }

              .content {
                font-family: Helvetica, sans-serif;
              }

              .call-to-action {
              }
Add a border & padding to the button
              .call-to-action {
                border: 1px solid #05c2d1;
                padding: 10px 16px;
              }
Apply a height to the button
Links are inline elements, which means we can't adjust their vertical spacing.
But we can change the display type to "inline-block", which treats the width of the element as an inline element but allows us to apply a height.
              .call-to-action {
                border: 1px solid #05c2d1;
                display: inline-block;
                margin-top: 10px;
              }
Style all links
Set the color
Remove default browser styles applied to links
              a {
                color: #05c2d1;
                text-decoration: none;
              }
Final Touches
Set the max-width to limit how wide the text can expand.
When a width has been specified, setting the left and right margin as "auto" as tells the browser to automatically determine the left and right margins itself, which it does by setting them equally.
              .container {
                text-align: center;
                max-width: 70%;
                margin: 0 auto;
              }
Final CSS
              a {
                color: #05c2d1;
                font-weight: bold;
                text-decoration: none;
              }

              .container {
                line-height: 1.7;
                margin: 0 auto;
                max-width: 70%;
                text-align: center;
              }

              .header {
                font-family: Helvetica, sans-serif;
                font-size: 48px;
                font-weight: bold;
                margin-bottom: 0;
              }

              .content {
                color: #7c8c8e;
                font-family: Helvetica, sans-serif;
              }

              .call-to-action {
                border-radius: 4px; /* new */
                border: 1px solid #05c2d1;
                display: inline-block;
                margin-top: 10px;
                padding: 10px 16px;
              }
Final HTML
                  Proven Results

                    Turing is difficult, but worth it. 75% of our students
                    graduate within 7 months, and 92% graduate within 10.5
                    months. 69% of graduates are employed full-time within 90
                    days of graduation. By 180 days, the percentage jumps to
                    80%. They're not project managers or off in a corner doing
                    the stapling. They are full-time software developers in
                    careers they love. Their median salary is $75K and, for
                    most, that's nearly double their previous salary.


                    We release our student outcomes semi-annually as founding
                    members of the Council on
                    Integrity in Results Reporting.


                    2016 Student Outcomes Report